That bubbling, purple-tinted film peeling away from your rear window is more than an eyesore. In Miami, where the sun hammers down year-round and humidity eats through cheap materials fast, bad window tint is a real problem: it spikes your cabin temperature, cracks your privacy, and can even land you a ticket if the shade falls outside Florida's legal limits. This guide walks you through everything you need to know to upgrade your auto tint the right way, from understanding the law and gathering the right tools to removing old film and applying a fresh, clean finish that actually lasts in Miami-Dade.
Table of Contents
- Understanding Florida tint laws for 2026
- What you need: Tools and materials checklist
- Step-by-step: Removing your old auto tint
- Applying new tint: Steps for a flawless DIY finish
- DIY or professional? Making the right upgrade choice in Miami
- Why most Miami drivers regret skipping professional tint upgrades
- Get professional results for your Miami auto tint upgrade
- Frequently asked questions
Key Takeaways
| Point | Details |
|---|---|
| Check legal limits | Florida sets strict VLT and reflectivity standards for 2026—always confirm before upgrading. |
| Preparation is vital | Gather all materials and thoroughly clean window surfaces for best tint results. |
| Remove old tint properly | Heat and peel slowly, ensuring all adhesive residue is gone before applying new film. |
| Quality matters | Premium, Miami-appropriate tints offer superior comfort and curb appeal. |
| Professional upgrade benefits | Expert installers provide compliance assurance, durability, and a flawless finish. |
Understanding Florida tint laws for 2026
Before selecting or installing any new tint, it's vital to ensure your upgrade will be street-legal. Florida's window tint laws are specific, and Miami police do enforce them.
Visible Light Transmission (VLT) is the percentage of natural light that passes through your window film. The lower the number, the darker the tint. Florida also sets limits on reflectivity, which measures how much light bounces back off the film rather than passing through. Too much glare from a reflective tint can blind other drivers and will get you flagged.
For Florida's 2026 tint thresholds, the published legal limits are:
- Front side windows: 28% VLT minimum (must allow at least 28% of light in)
- Rear side windows: 15% VLT minimum
- Rear window: 15% VLT minimum
- Reflectivity: Both front and rear windows must not exceed 25% reflectivity
- Windshield: Non-reflective tint is allowed only above the manufacturer's AS-1 line
Ignoring these numbers has real consequences. Officers use a handheld device called a tint meter to measure VLT on the spot. If your windows fail, you can face a moving violation, a fine, and a requirement to remove the tint before your vehicle passes re-inspection. In some cases, you'll pay more to fix the mistake than you would have spent on compliant film from the start.
If you want a deeper breakdown of how these rules apply to window tint for Miami's climate, it's worth reading up before you buy anything. Compliance isn't a suggestion in Florida. It's the baseline.
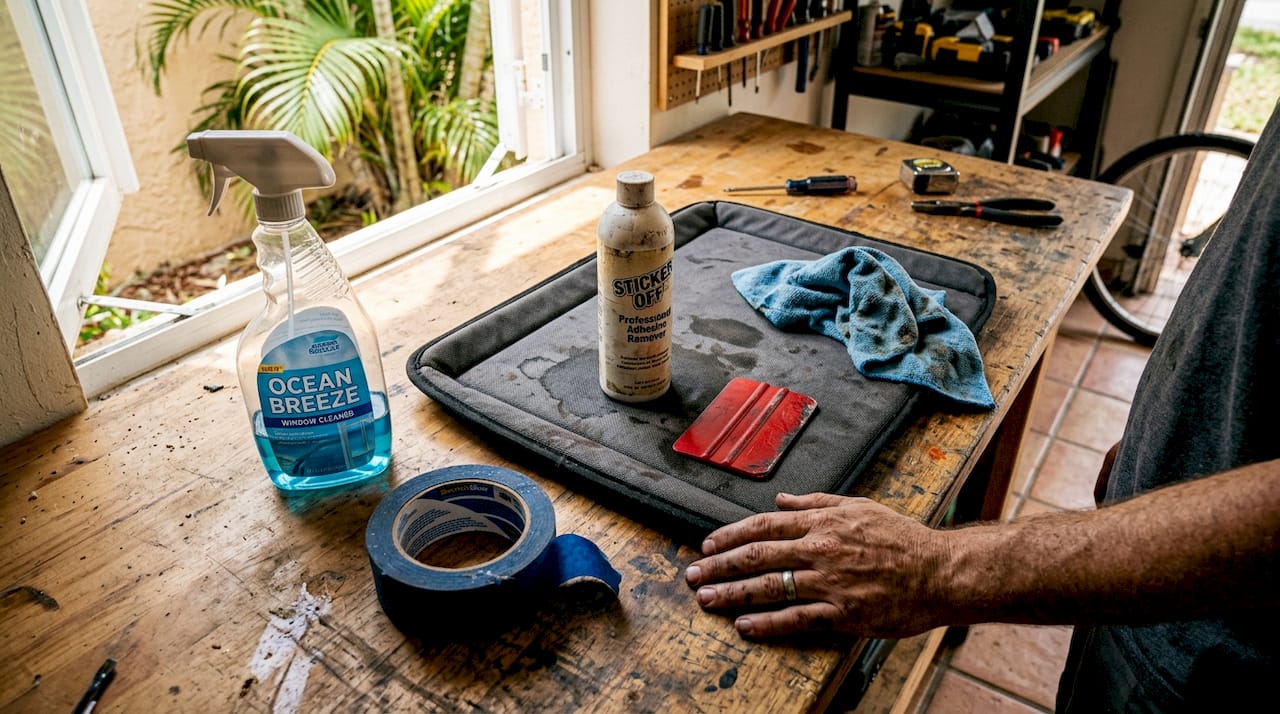
What you need: Tools and materials checklist
With legalities in mind, gathering the right tools is the first step toward a flawless upgrade. Skimping here is how most DIY jobs end in bubbles and frustration.
Here's everything you'll need before starting:
- Window tint film (pre-cut or bulk roll, matched to legal VLT)
- Heat gun or hair dryer for film removal and adhesion
- Adhesive remover or rubbing alcohol to clean residue
- Utility knife or precision blade for cutting film
- Hard card squeegee for smoothing and sealing
- Microfiber towels (lint-free is essential)
- Spray bottle with soapy water (a few drops of baby shampoo in water)
- Razor blade scraper for stubborn adhesive
- Tape measure and marker for cutting accuracy
Upgrading auto tint means removing existing film before applying new tint, which makes the adhesive remover just as important as the film itself. Skipping the cleaning step is the number one cause of new tint failing within months.
Here's a quick comparison of a basic kit versus professional-grade tools:
| Tool category | Basic DIY kit | Pro-level tools |
|---|---|---|
| Squeegee | Plastic card squeegee | Slip-resistant felt squeegee |
| Heat source | Hair dryer | Commercial heat gun (adjustable temp) |
| Cutting tool | Box cutter | Precision plotter or trim knife |
| Cleaning agent | Generic glass cleaner | Ammonia-free adhesive remover |
| Film quality | Standard polyester | 3M IR or ceramic (like Iviron Kollmax) |
For choosing the right tint in Miami's climate, film quality matters more than most people realize. Standard dyed films degrade quickly under intense UV exposure. Ceramic films like 3M Color Stable and Iviron Kollmax reject significantly more infrared heat without darkening further over time.
Pro Tip: Buy Miami-grade ceramic or infrared-rejecting film for your upgrade. Standard dyed tint fades and discolors under Florida sun within 12 to 18 months. The extra cost upfront saves you from repeating this entire process sooner than you'd like. You can compare your options in detail at comparing tint options.
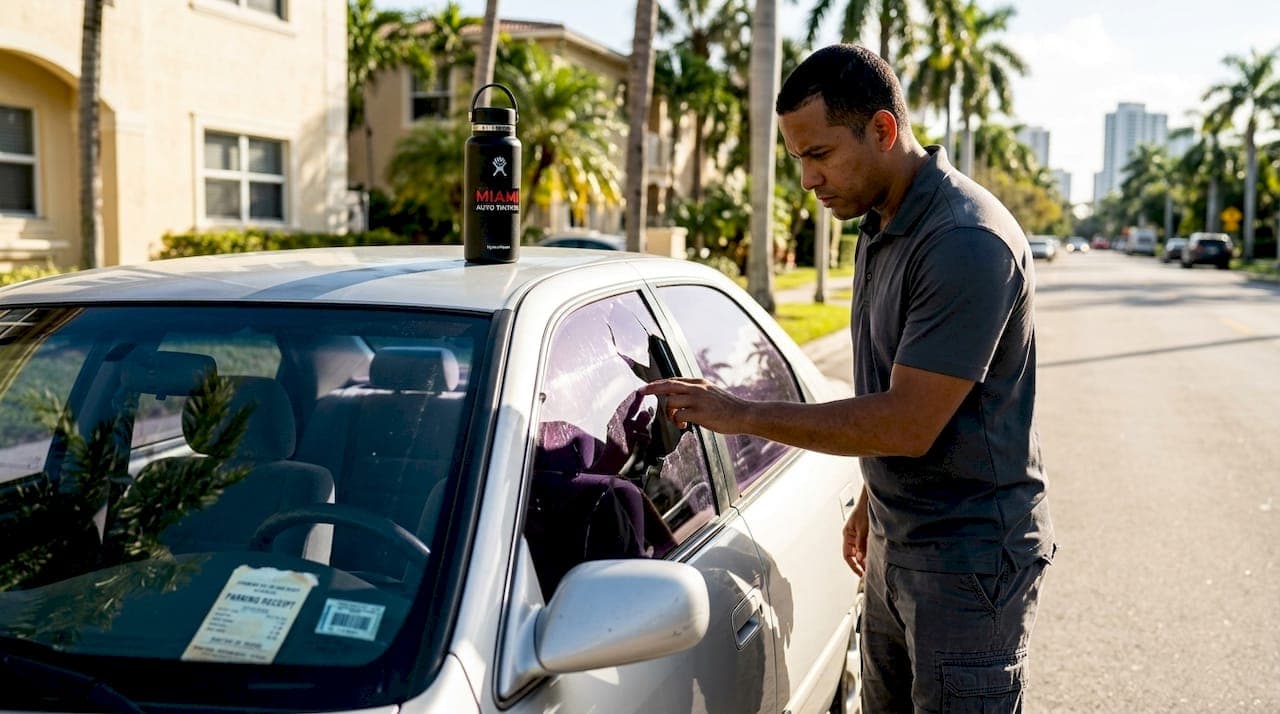
Step-by-step: Removing your old auto tint
Once prepared, start the upgrade by properly removing old tint for a clean foundation. Rushing this part is the most common reason new tint fails.
Old tint adhesive hardens over time, especially in Florida's heat. If you try to peel cold film, it will tear into strips and leave thick, sticky residue on your glass that takes hours to scrub off. Heat makes everything easier.
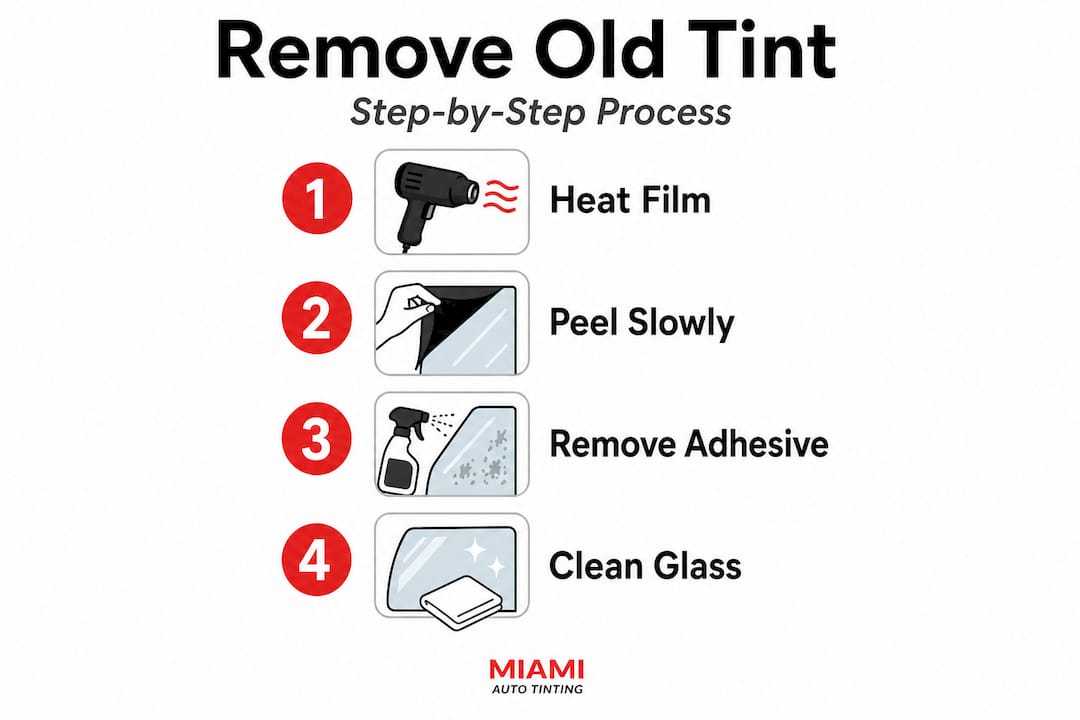
Here's the step-by-step removal process:
- Heat the film using a heat gun on medium or a hair dryer held 2 to 3 inches from the glass for 30 to 60 seconds per section.
- Peel a corner using your fingernail or a plastic blade to lift a starting edge.
- Pull slowly at a low angle to keep the film intact. Fast pulls cause tearing.
- Reapply heat as you move across the window, keeping the film warm throughout.
- Remove adhesive residue with adhesive remover or isopropyl alcohol. Soak stubborn patches and let them sit for two minutes before scraping.
- Wipe clean with a microfiber towel. Repeat until no sticky spots remain.
- Inspect in bright light before moving on. Any remaining residue will show up as bubbles or cloudiness under the new film.
"Residue can cause bubbles, peeling, or uneven application." Proper removal is not optional if you want your new tint to last.
Here's a quick reference for the most common mistakes during removal:
| Mistake | Why it's a problem | How to avoid it |
|---|---|---|
| Peeling cold film | Tears film, leaves heavy residue | Always heat before peeling |
| Using metal scrapers dry | Scratches glass | Wet the surface with adhesive remover first |
| Rushing residue removal | New tint won't bond correctly | Take time to clean every inch |
| Skipping final inspection | Invisible residue causes bubbles | Use a flashlight at a sharp angle to check |
Pro Tip: For especially stubborn adhesive, soak the area with adhesive remover, place a damp microfiber cloth over it, and wait five minutes before scraping. The soaking method removes 90% of residue in one pass instead of five.
If you're weighing whether to take this on yourself, our breakdown of DIY vs. professional tinting lays out exactly where the risk points are.
Applying new tint: Steps for a flawless DIY finish
Now that the surface is prepped, here's how to achieve a professional-looking tint upgrade at home. Cleanliness and patience are everything at this stage.
Follow these steps carefully:
- Clean the glass one final time using your spray bottle with soapy water and a clean microfiber towel. Even fingerprints will cause bubbles.
- Measure each window using a tape measure, then cut your film leaving about half an inch of extra material on every edge.
- Wet the glass with your soapy water solution. This allows the film to slide and be repositioned before it bonds.
- Peel the film liner carefully, keeping the adhesive side wet by misting it as you work.
- Apply the film to the inside of the window with the adhesive facing the glass. Position it with half an inch of overlap on all edges.
- Squeegee from the center outward using firm, overlapping strokes to push out water and air bubbles.
- Trim the edges with a precision blade once the film is positioned correctly, pressing into window gaskets to hide the edge.
- Final squeegee pass along all edges to seal completely.
- Allow curing time of 3 to 5 days before rolling windows down. In Miami's heat, curing is faster, but don't rush it.
"Residue can cause bubbles, peeling, or uneven application." The same principle applies at the application stage. A single dust particle or oily fingerprint trapped under new film will show up within a week.
Quick troubleshooting tips for common problems:
- Small bubbles after application: Often disappear during curing. Wait 5 days before judging.
- Water pockets: Use the squeegee again while film is still movable.
- Creases in the film: Carefully peel back and re-apply. Creases don't smooth out on their own.
- Lifting edges: Reapply heat and press firmly with squeegee, or use a hard card.
- Misalignment: Wet the glass again and slide the film while still repositionable.
For a deeper breakdown of the full process and product selection tips, the ultimate guide to window tint covers every detail you'd want before starting.
DIY or professional? Making the right upgrade choice in Miami
If you're unsure about doing it yourself, consider these comparisons to help you decide. The honest answer is that both options work, but they suit very different situations.
Upgrading old or failing tint is more technical than most car owners expect, especially if the existing film has been on the car for years. Here's how DIY and professional installation compare:
| Factor | DIY upgrade | Professional installation |
|---|---|---|
| Cost | $40 to $120 for materials | $150 to $400 depending on film and vehicle |
| Time | 4 to 8 hours for a full car | 1.5 to 3 hours |
| Risk | Higher, especially on curved glass | Very low with experienced installer |
| Warranty | None | Most shops offer 1 to 5 year warranties |
| Film quality | Limited to retail options | Access to 3M IR, Iviron Kollmax, and others |
| Compliance guarantee | Depends on your knowledge | Professional shops know Florida's 2026 limits |
DIY makes sense when:
- You're upgrading a single flat window
- You've done it before and have the tools
- You're working with a tight budget and have time to practice
Professional installation makes sense when:
- Your car has complex curved glass
- You want ceramic film like 3M IR or Iviron Kollmax
- You need a documented compliance guarantee for inspections
- You've already had a DIY attempt bubble or peel
The long-term math often favors professionals. A $200 professional job with a 5-year warranty beats a $100 DIY project you redo twice. The benefits of car window tinting also compound over time with better heat rejection and UV protection from premium films. For a direct side-by-side breakdown, check out DIY vs professional auto tinting to see which path fits your situation.
Why most Miami drivers regret skipping professional tint upgrades
Here's something most tint guides won't tell you. The biggest mistake Miami drivers make is not the film they pick or the tools they use. It's the assumption that a good result is equally likely with or without professional help. In Miami, that assumption is especially costly.
We've seen drivers buy quality ceramic film, spend a full weekend on their car, and still end up with lifting edges within three months. Why? Because Miami's combination of intense UV, humidity, and heat cycling is one of the harshest environments any window film has to survive. Application errors that might last a year in a mild climate fail in 90 days here.
There's also the legal side. Law enforcement can measure tint with a tint meter during any traffic stop. A DIY job done with bulk film and no calibrated measurement tools creates real legal exposure. We've seen Miami drivers get ticketed with film that looked dark enough to the eye but failed at the meter.
Professional installers bring calibrated film, documented VLT values, and experience working with Florida's exact thresholds. When a reputable shop hands you a certificate of compliance, that piece of paper has real value at a traffic stop.
The professional car tinting advice we share consistently comes back to one point: the climate here demands precision that most DIY setups can't reliably deliver. Done right the first time, a professional tint job on 3M IR or Iviron Kollmax ceramic film will hold up for 5 to 10 years, keep your cabin noticeably cooler, and survive every inspection. That's not a small thing in a city where you spend real time in your car every single day.
Get professional results for your Miami auto tint upgrade
Ready to skip the headaches and get your vehicle looking its best from the first day? Whether your current tint is peeling, fading, or simply not cutting it against Miami's sun, a professional upgrade is the fastest path to a cleaner look, real heat rejection, and guaranteed compliance.
We offer mobile window tinting throughout Miami-Dade using 3M IR, 3M Color Stable, and Iviron Kollmax ceramic films. These are the films that hold up in Florida's climate, not the budget rolls you find at a hardware store. Our team comes to your home, office, or wherever your car is parked, so there's no drop-off and no waiting around. Explore our 3M ceramic film tinting options or book our mobile ceramic tinting service for a same-week appointment at your location. Our expert mobile tinting team handles everything, from removal to compliance verification.
Frequently asked questions
What is the legal window tint for cars in Miami in 2026?
In Florida for 2026, front side windows must allow at least 28% of light in, while rear side and back windows can go as dark as 15% VLT. Reflectivity must stay at or below 25% on all windows.
Can I remove old window tint myself without damaging the glass?
Yes. By heating the old film to soften the adhesive and peeling slowly at a low angle, then cleaning all residue with an adhesive remover, you can remove tint cleanly without scratching the glass.
How long does it take to upgrade auto tint?
A full DIY removal and reapplication on a four-door sedan typically takes 4 to 8 hours. A professional shop or mobile installer can usually complete the same job in under two hours.
Will a professional tint job pass Florida's 2026 inspection?
Most reputable Miami tint installers guarantee compliance with Florida's 2026 tint laws and provide documentation showing your film's VLT values, which is useful if you're ever stopped by an officer using a tint meter.